
School admission processes always look simple on paper. The Step-by-Step Admission Process Explained often feels confusing for parents, especially during the first application cycle.A few forms. Some documents. A deadline here and there. But when you’re actually inside it — tabs open at midnight, comparing instructions from three different school websites that all say slightly different things — it starts feeling less like a process and more like a maze.
And honestly, most parents going through Step-by-Step Admission Process Explained searches online aren’t looking for theory. They’re trying to figure out what actually happens… first, second, third. What comes after what. What can go wrong. What to prepare before things start moving quickly.
Because once admissions open, things move fast. Schools release forms. Deadlines appear suddenly. Interaction rounds get scheduled. And before you realize it, you’re organizing documents on the dining table while your child is asleep in the next room, completely unaware that their parents are planning something that feels strangely big.
So let’s walk through the Step-by-Step Admission Process Explained in a way that feels closer to reality. Not perfect steps. Just the usual flow most parents end up experiencing.
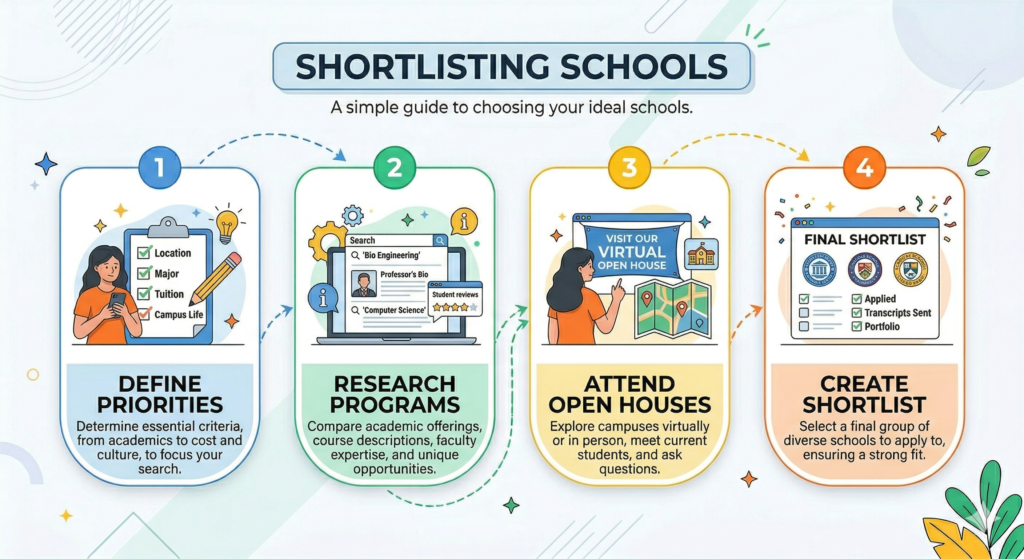
Step 1: Shortlisting Schools
This step begins quietly. No forms yet. No pressure. Just browsing.
Parents usually start with a list in their head — schools they’ve heard about, schools recommended by relatives, maybe one that a neighbor’s child attends. Slowly that list becomes real. A notebook page. A spreadsheet. Something slightly more organized than random thoughts.

During the early stage of Step-by-Step Admission Process Explained, shortlisting usually depends on a few things:
• Distance from home
• Academic reputation
• Board affiliation
• Infrastructure and facilities
• Safety and transport options
Sometimes parents visit the schools personally. Sometimes they rely entirely on online research. Both ways happen.
But here’s the thing people rarely say out loud — no school looks imperfect during admission season. Every website shows smiling classrooms, large playgrounds, confident students. Which means parents often rely on small signals.
The tone of staff members.
The way teachers speak during open houses.
Whether the environment feels welcoming or strangely formal.
Tiny observations. But they stay in your mind.
Step 2: Understanding Admission Notifications
Once schools release admission notifications, the real process begins.
These announcements are usually posted on school websites, notice boards, or social media pages. Some schools send email alerts if parents have subscribed earlier.
In the Step-by-Step Admission Process Explained, admission notifications usually contain details like:
• Application start date
• Application deadline
• Eligibility criteria
• Required documents
• Admission procedure
And here’s where parents often pause and read the same lines twice.
Because instructions can feel… dense.
One school asks for documents during application. Another asks after shortlisting. Some schools conduct interviews. Some don’t. Some require physical form submission even if the application started online.
So many tiny variations.
Which is why experienced parents usually keep a small checklist for every school they apply to.
Not fancy. Just clarity.

Step 3: Filling the Application Form
This is the moment where the process becomes real.
The application form.
For many schools in the Step-by-Step Admission Process Explained, applications are now online. But some schools still combine online registration with physical document submission later.
Application forms usually ask for basic details:
• Child’s full name
• Date of birth
• Parent details
• Address
• Contact information
• Previous school details (if applicable)
Sometimes the form also asks small questions about parents’ occupations or educational background. Not always important for the decision, but still part of the form.
The key here is simple — fill slowly.
Parents rushing through forms sometimes make small mistakes. A wrong date of birth. Incorrect spelling. Missing attachments.
And correcting those later can be surprisingly annoying.
So most parents eventually develop a small ritual.
Open the form.
Save drafts.
Double-check everything.
Submit only when it feels right.
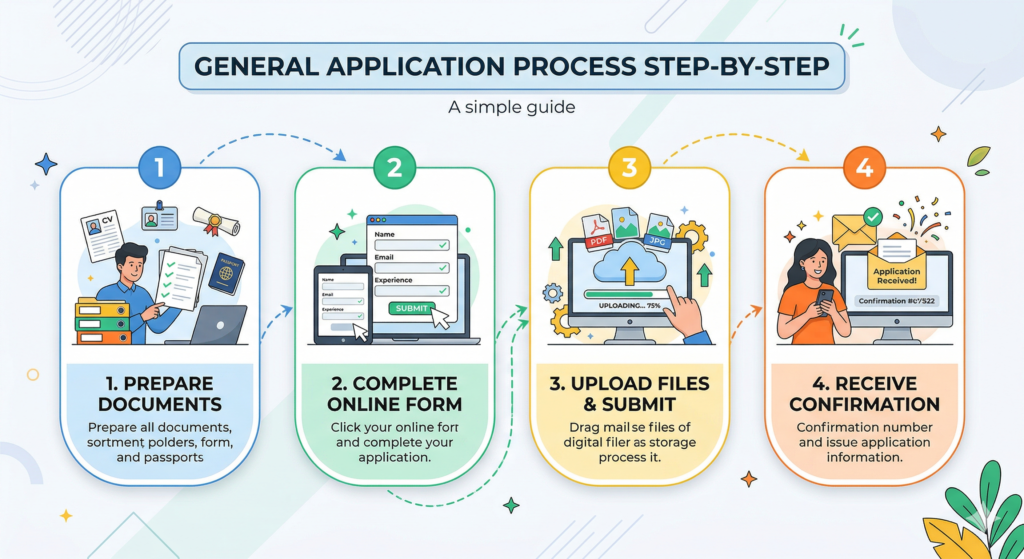
Step 4: Document Submission and Verification
After submitting the application form, the next stage in the Step-by-Step Admission Process Explained is document verification.
Schools need proof for the details provided in the form. Which means parents must submit supporting documents.
Commonly required documents include:
• Birth certificate
• Passport-size photographs
• Address proof
• Aadhar card copies
• Previous school report cards
• Transfer certificate for higher classes
Some schools allow uploading scanned copies during application.
Others ask parents to visit the campus physically for verification.
This part can feel slightly tedious. Photocopies. Signatures. Attestation sometimes.
But once documents are accepted, parents often feel the first small wave of relief.
Something official has started.
Step 5: Interaction Rounds or Entrance Assessments
This is the stage where admissions feel personal.
For nursery and kindergarten admissions, many schools organize parent-child interaction sessions rather than formal interviews. The goal isn’t to test the child academically. It’s usually a short conversation.
Teachers may observe simple things:
• How comfortably the child responds
• Basic communication ability
• Comfort level in a new environment
Parents are sometimes asked basic questions too.
Nothing dramatic. Just general discussions about family background or expectations from the school.
For higher classes, the Step-by-Step Admission Process Explained often includes written assessments instead.
These tests may cover:
• English comprehension
• Basic mathematics
• General awareness
Not extremely difficult. But schools use them to understand a student’s academic level.
Some parents worry too much about these interactions.
In reality, they’re usually short and relaxed.
Children often finish the interaction and immediately ask for snacks afterward.
Step 6: Shortlisting and Admission Lists
After interactions or assessments, schools begin reviewing applications.
This waiting period can feel strangely long.
Parents refresh emails. Check school websites repeatedly. Talk to other parents who applied to the same school.
During the Step-by-Step Admission Process Explained, schools eventually release admission lists. Sometimes in phases.
The lists usually include:
• Selected candidates
• Waiting list candidates
• Instructions for next steps
If a child’s name appears in the selected list, parents must confirm admission within the given timeline.
If the name appears on the waiting list… things become uncertain.
Sometimes seats open. Sometimes they don’t.
Admission seasons are full of these quiet uncertainties.
Step 7: Fee Payment and Admission Confirmation
Once selected, the final step in the Step-by-Step Admission Process Explained is fee payment.
Schools usually provide a deadline to complete admission formalities. Parents must submit:
• Admission fee
• First term fee
• Security deposit (in some schools)
Payment confirms the seat officially.
After this stage, schools usually provide:
• Admission confirmation letter
• Book list
• Uniform guidelines
• Academic calendar
And suddenly the admission process — which felt complicated for weeks — ends with something simple.
A confirmed seat.
Common Things Parents Realize Too Late
Admissions always come with small lessons.
Some parents later say they should have applied to more schools. Others wish they had started research earlier.
A few things experienced parents often recommend during Step-by-Step Admission Process Explained:
• Apply to multiple schools
• Keep documents ready beforehand
• Track deadlines carefully
• Attend school open houses if possible
• Avoid rushing decisions under pressure
Admissions are unpredictable sometimes.
Preparation just makes the experience calmer.

Conclusion
Looking back, the Step-by-Step Admission Process Explained always seems simpler than it felt while going through it.
Forms were filled. Documents arranged. Interaction rounds attended. Emails checked again and again.
But in the middle of all that administrative work sits something very human — parents trying to find the right starting point for their child’s education.
And children, interestingly, rarely feel the pressure adults create around admissions.
For them, school begins with small things.
A new bag.
New classmates.
A classroom that smells like books and crayons.
The admission process ends quietly.
The real journey begins after that.
FAQs
1. What is the first step in the school admission process?
The first step in the Step-by-Step Admission Process Explained is shortlisting schools based on location, curriculum, facilities, and reputation.
2. Are school admission forms available online?
Yes, many schools now offer online admission forms, although some still require physical document verification later.
3. Do schools conduct interviews for nursery admissions?
Most schools conduct parent-child interaction sessions rather than formal interviews or tests for nursery admissions.
4. What happens after submitting the admission form?
After submitting the form, schools review applications, verify documents, and may conduct interaction rounds or assessments.
5. When is admission confirmed?
Admission is confirmed after the student’s name appears in the selection list and parents complete the fee payment and admission confirmation process.